The Modes tab determines what the radio switches do to the quad. As with most of Betaflight, there are a number of things that can be done with radio switches, from changing LED colors to adjusting PIDs, but in this bare-bones example, we are just going to set up an Arm switch and a flight mode switch.
8a. Arm/disarm switch
From Step 7, remember that we set up a two-position switch, Switch F, to operate on Channel 5, which is Aux 1 on the flight controller. We will now assign this switch to arm and disarm the quad.
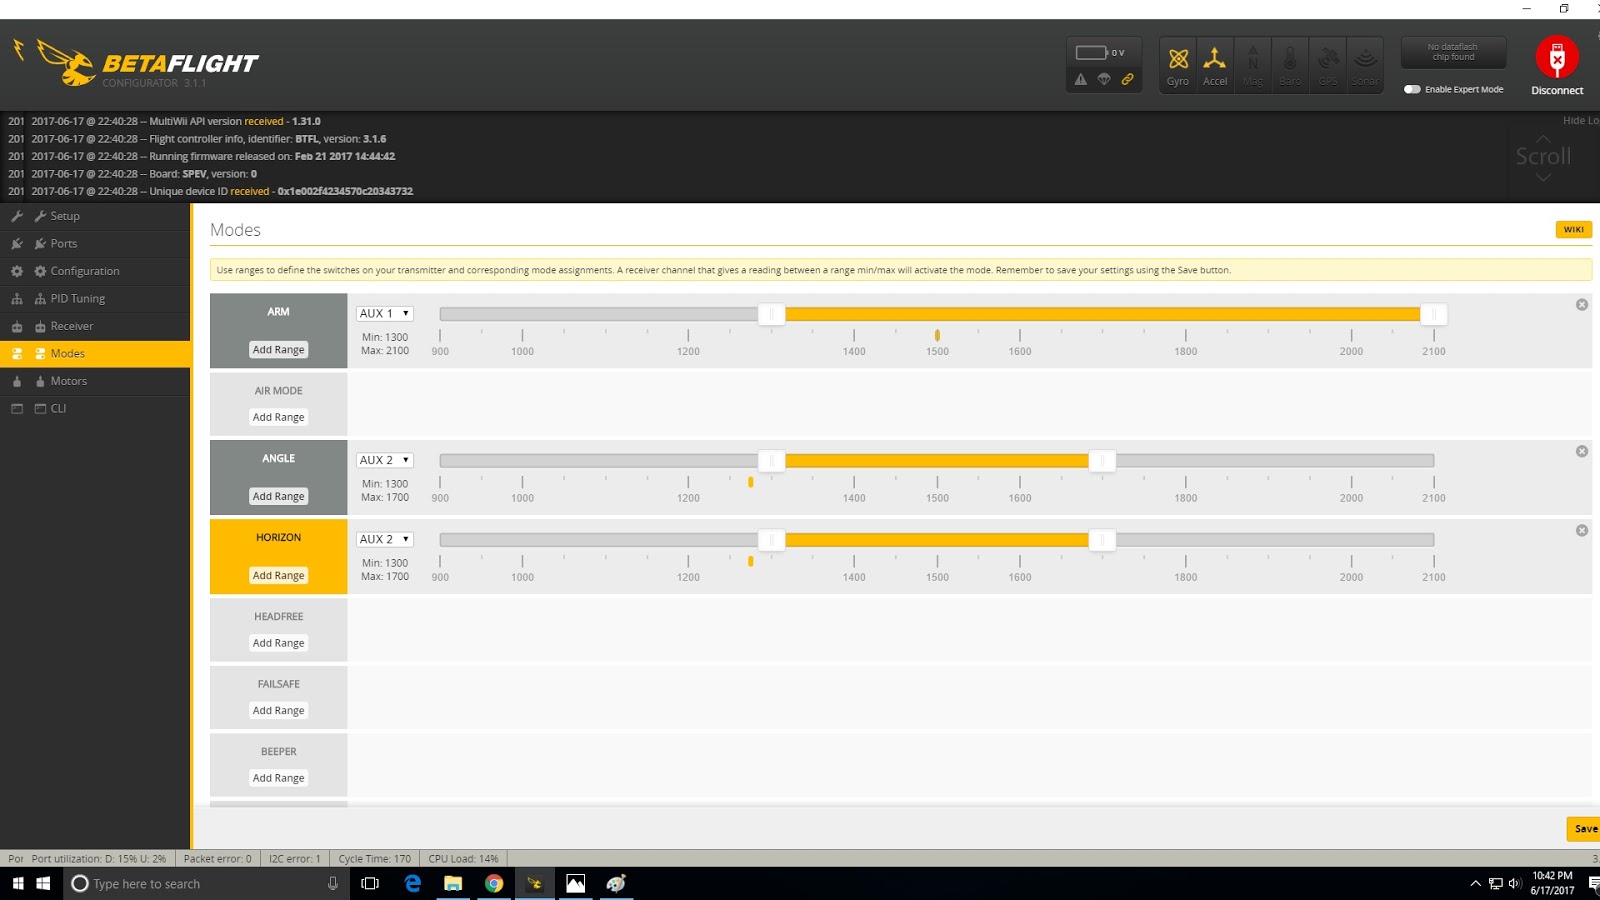
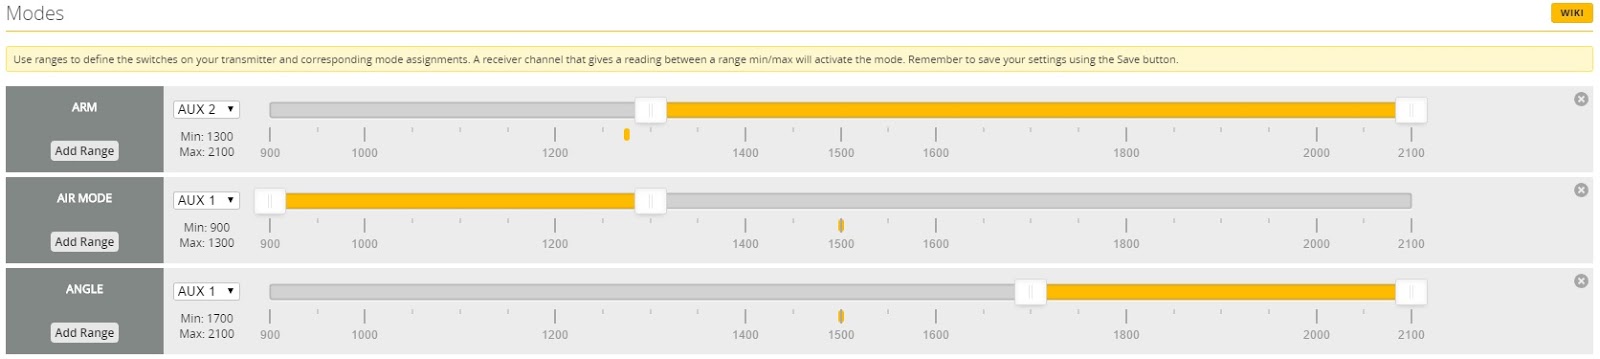
Click the Modes tab in the left margin of the Betaflight configurator. You will see a series of mode options in the main window with a drop down and a slider bar. The first mode is labeled ARM.
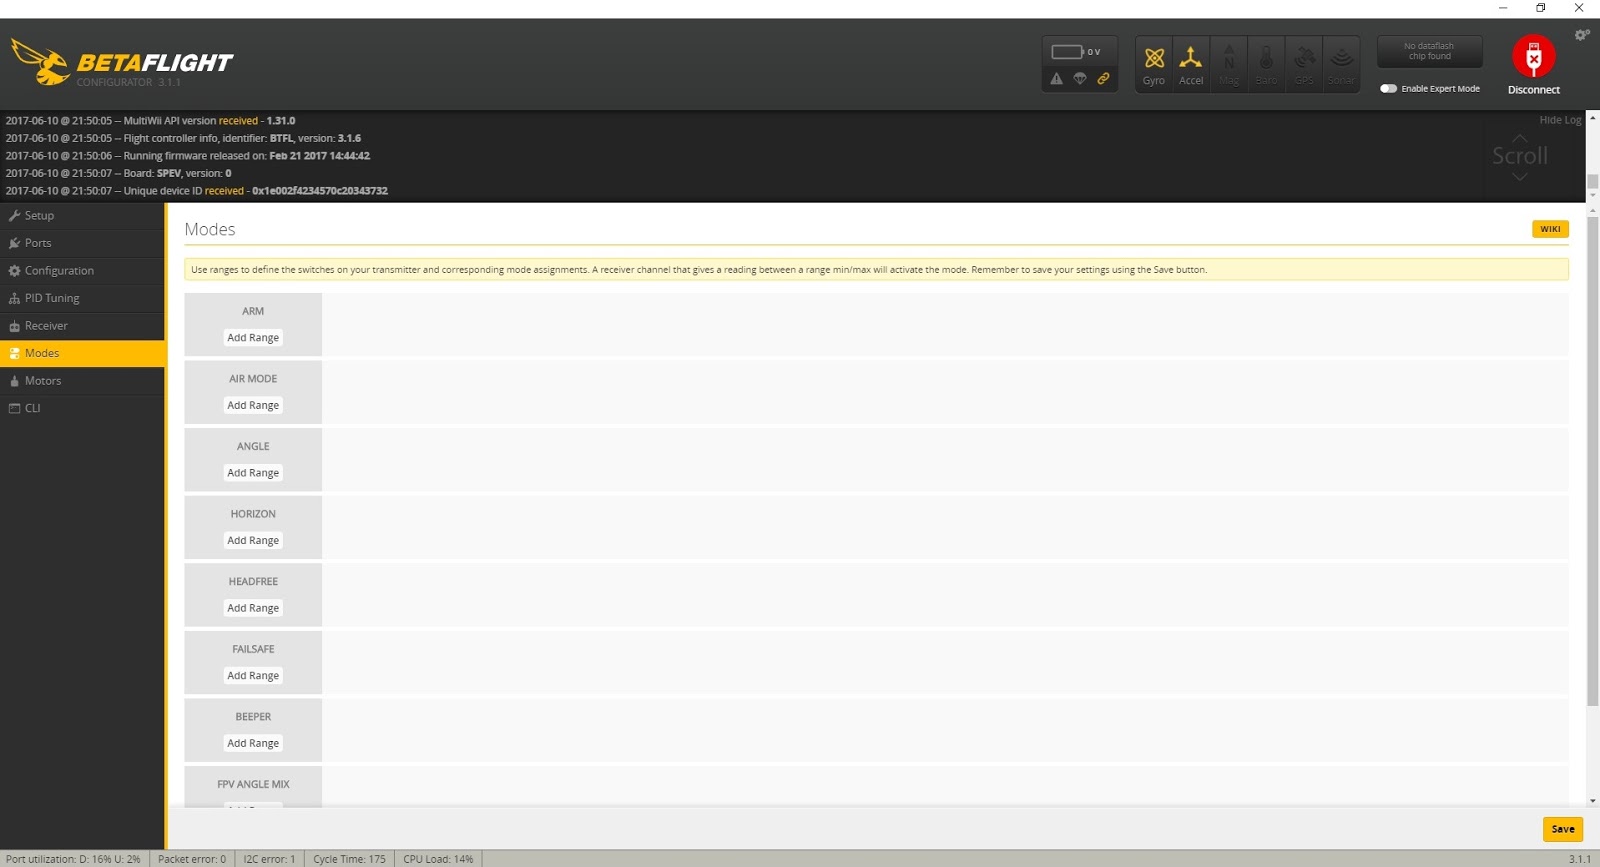
Below the word ARM, click the button called “ADD RANGE” and then to the right of the large ARM box click the drop down box and select AUX 1. ARM is now assigned to Aux 1 which, in our example, we’ve previously assigned to switch F.
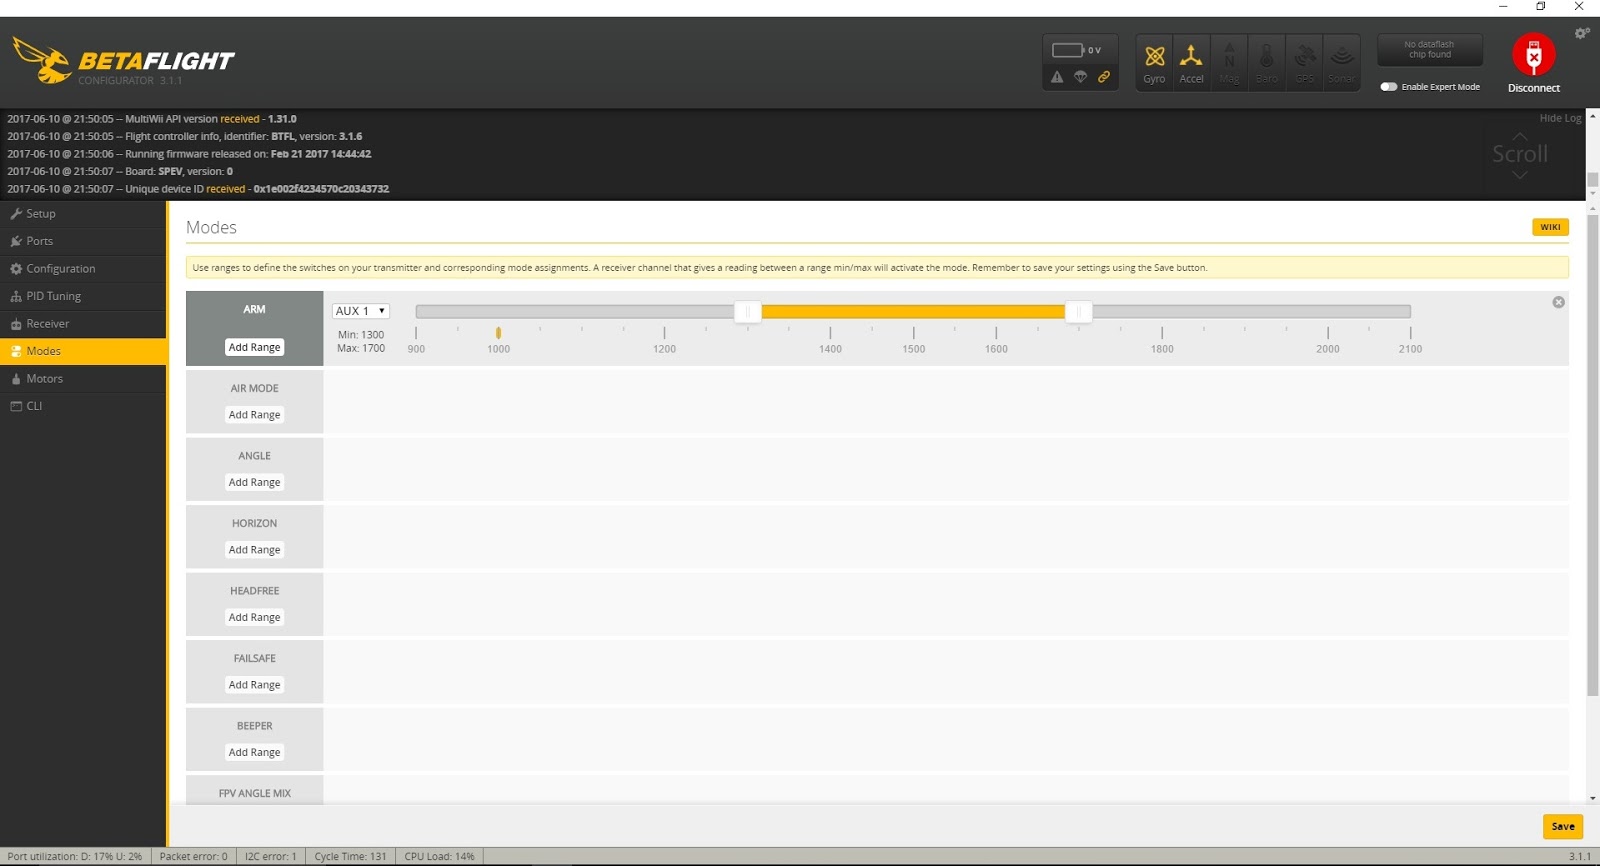
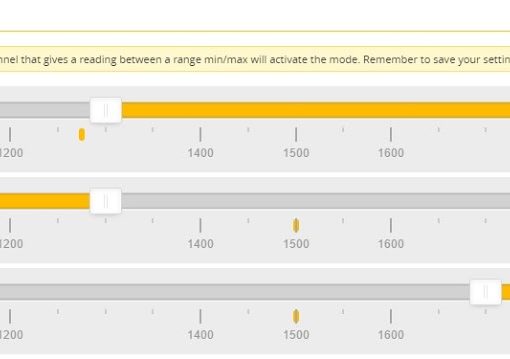
Next we need to tell the flight controller at what position we want the switch to arm the quad. This is done by dragging the slider bar of the switch reading we want to arm the quad. Typically, we want the quad to arm when we flip the switch towards us. If you recall from our switch calibration, the two-position switch had endpoints of 1000 when down (away from the pilot) and 2000 when up (towards the pilot) Drag the ends of the slider bar so that it spans from about 1300 all the way to the end of the scale, to 2100. The area covered by the bar is the “on” area for the switch so the quad will arm any time Switch F is sending a signal of 1200 to 2100. Given that Switch F is a two-position switch, it only sends the two signals we calibrated it for: 1000 and 2000. So when it’s down (away) it is sending a signal of 1000 and will NOT arm the quad because the quad unless the switch sends a signal between 1300 and 2100.
When the switch is flipped up (towards the pilot), it is sending a signal of 2000, which IS in the range of 1300 to 2100 so the quad will arm.
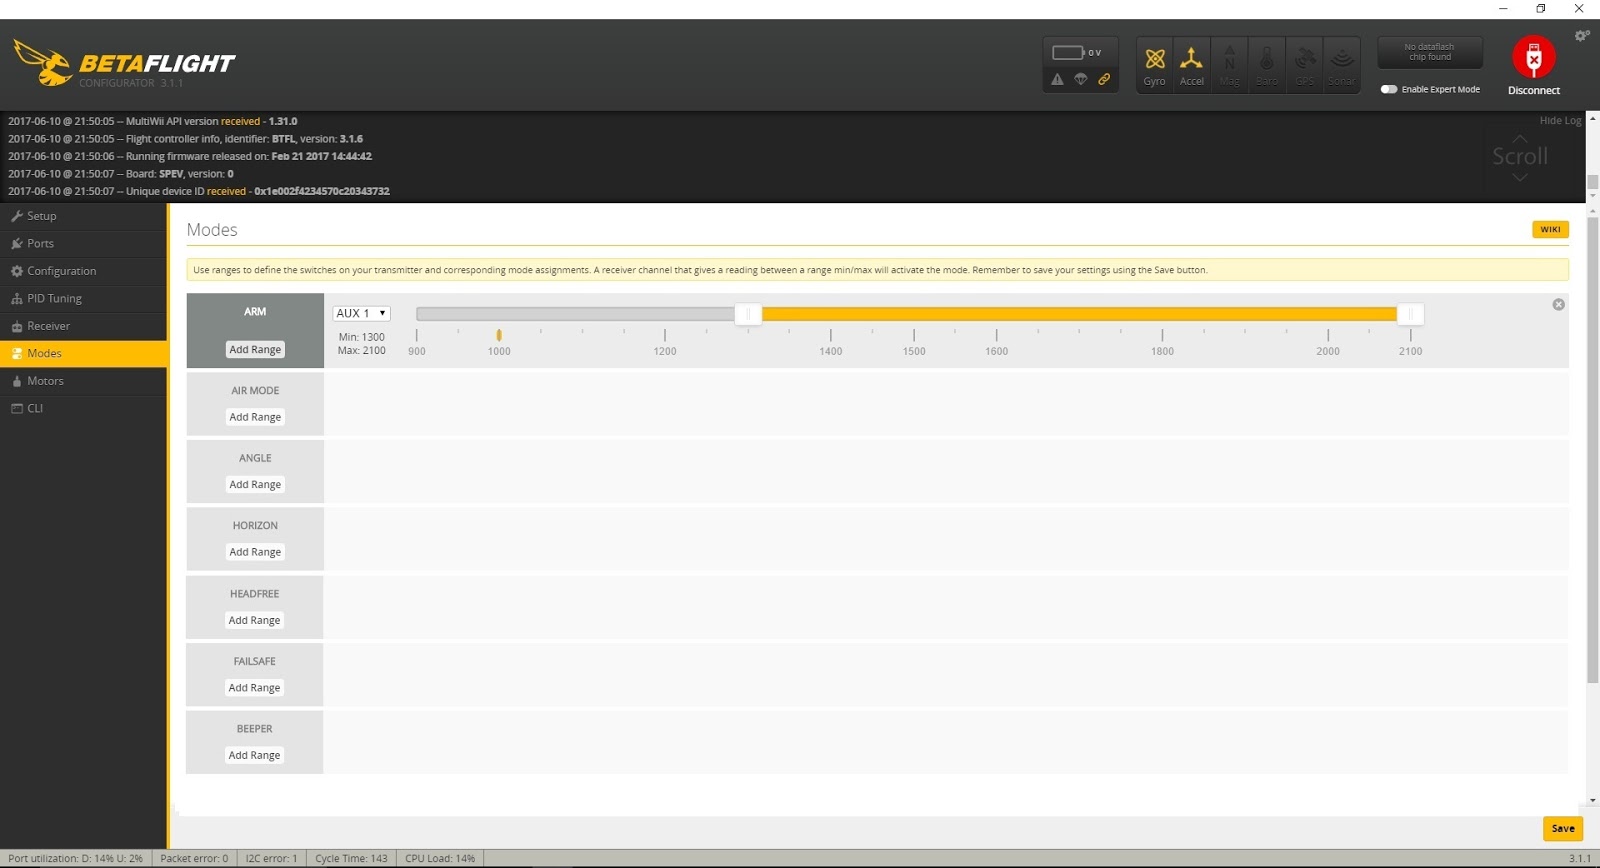
Note that The values of 1300 and 2100 don’t need to be exact. As long as the slider covers the 2000 setting, the quad will arm. But because end points can fluctuate over time, it’s best to give the switch a wide range. 1300 to 2100 is a huge range given that all we need to “cover” is 2000 but there’s no reason not to set a large range. Technically, the quad would arm if the bar spanned from 1999 to 2001.
Click the SAVE button below to save the settings.
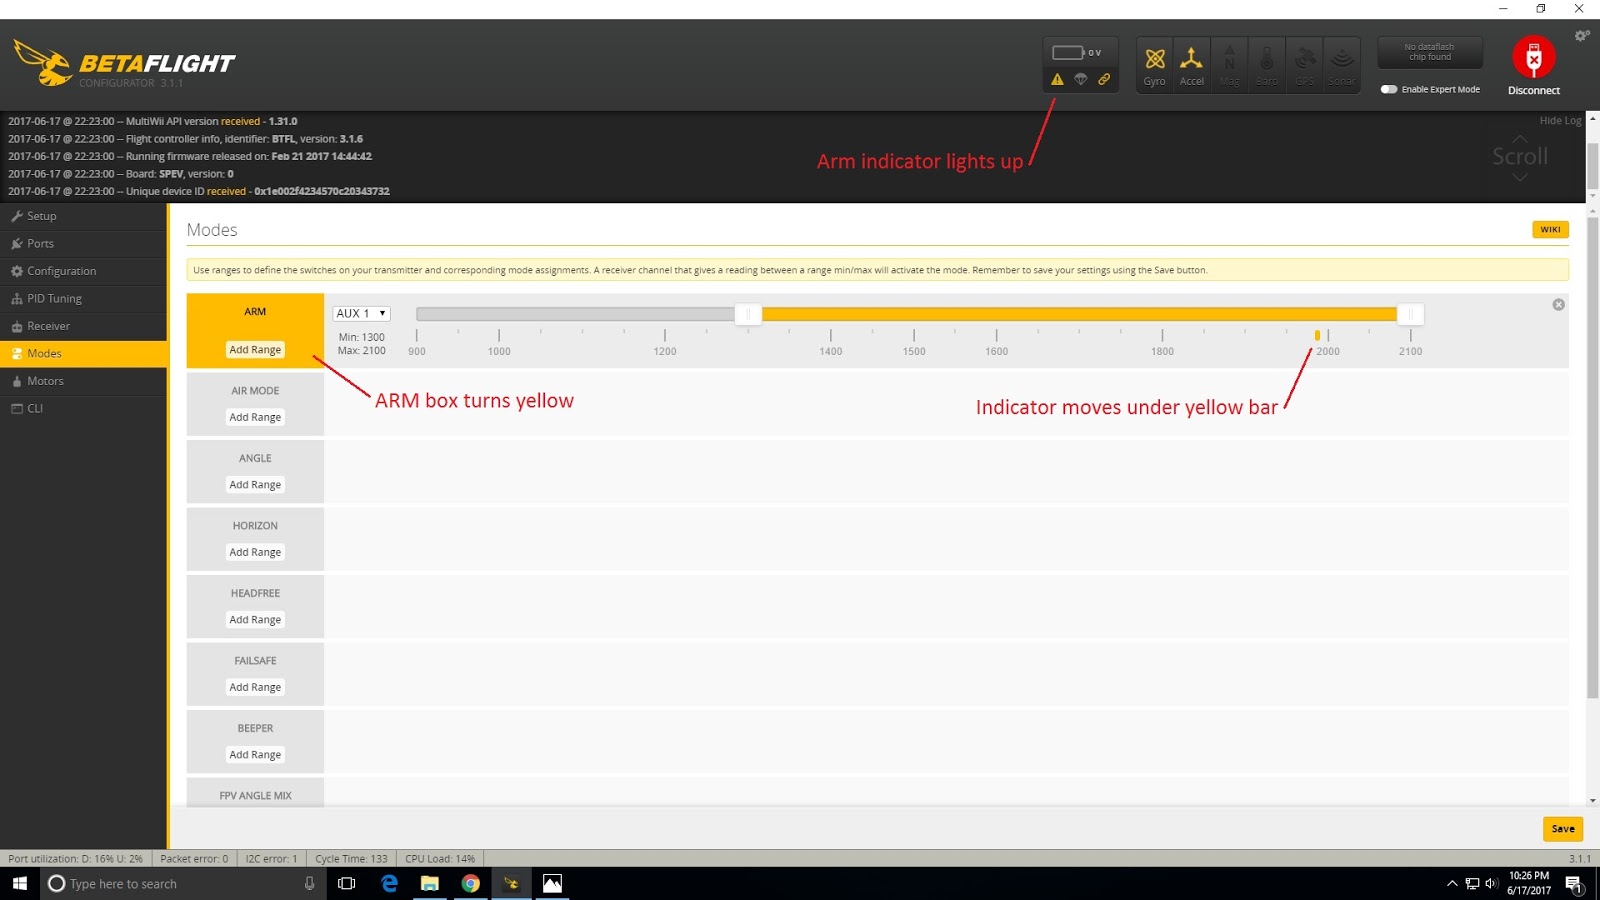
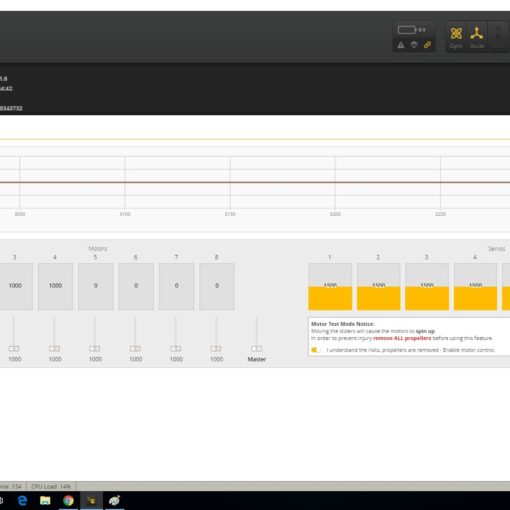
Next we will test the Arm switch. REMOVE YOUR PROPS BEFORE PLUGGING IN A BATTERY! Turn on the radio, plug in a battery, and ensure the flight controller is still connected to the PC via a USB cable. The small yellow indicator on below the slider bar should be pointing to 1000. The ARM box should be gray. And the small yellow warning triangle icon in the top margin next to the parachute icon should be grayed out. Make sure the quad is on a flat and level surface.
Flip Switch F and several things should happen. The small yellow indicator below the slider bar should move to 2000. The ARM box should turn yellow, the yellow warning triangle icon should turn yellow, and, most importantly, the motors should start to spin.
If the indicator doesn’t move at all, then either the switch hasn’t been properly assigned to AUX 1 on the radio (Step 7) or AUX 1 hasn’t been assigned to the ARM mode. Recheck the drop down next to the ARM box and ensure it is set to AUX 1. Click the SAVE button again to ensure the changes were saved.
If the indicator moves and the ARM box turns yellow but the small yellow armed triangle doesn’t light, it is probably because the flight controller is not level and right-side up. The flight controller must be reasonably level for it to arm.
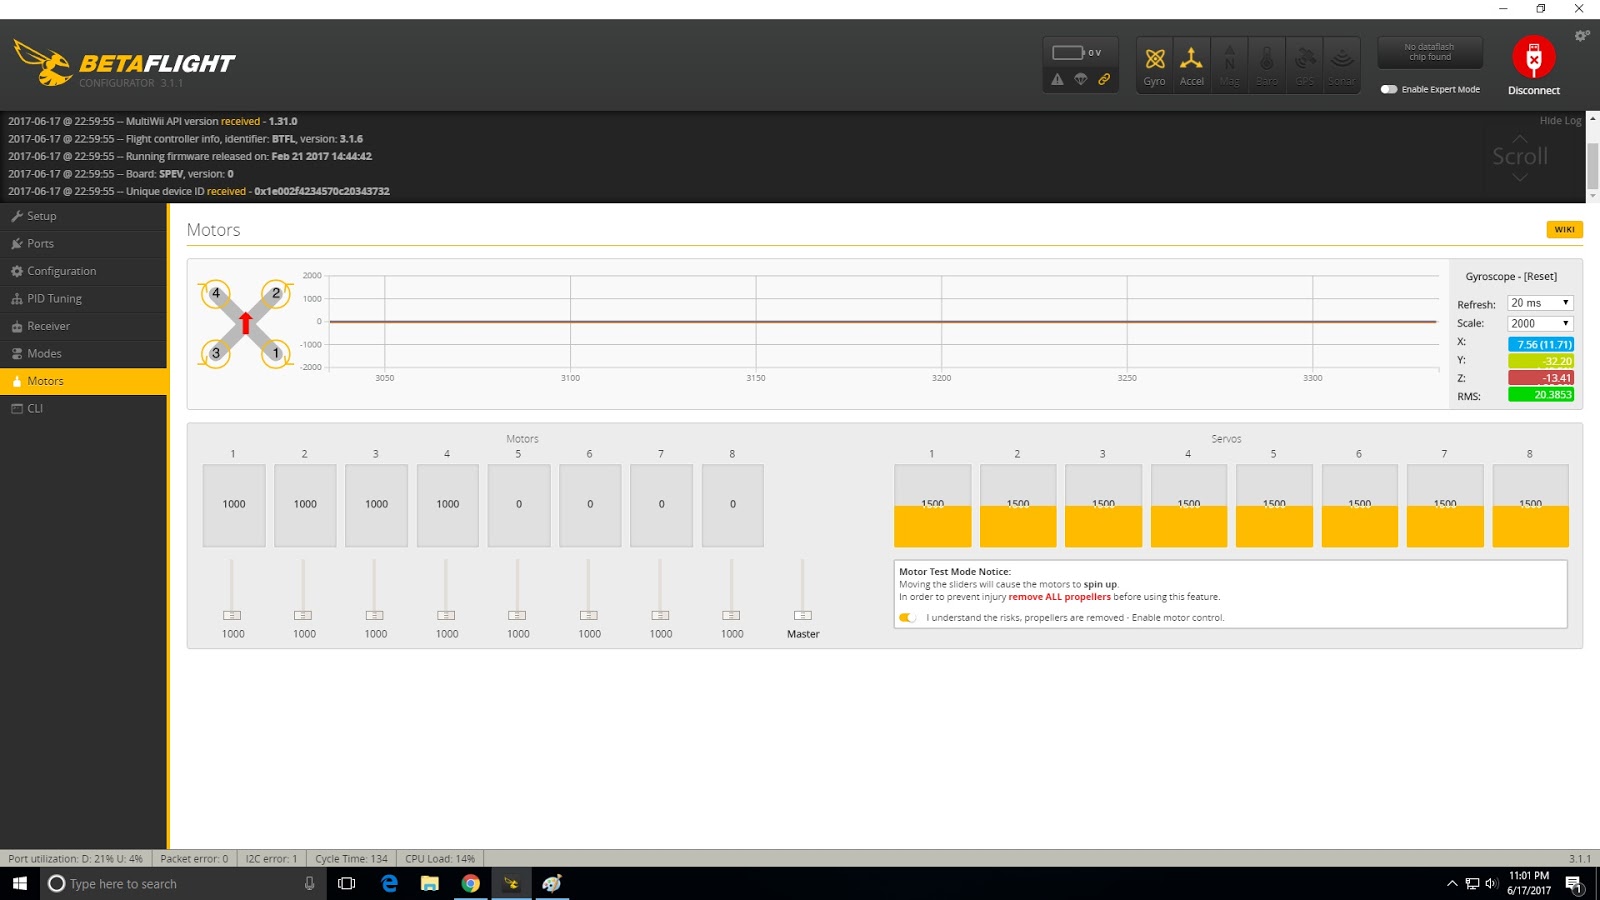
If the Betaflight configurator indicates the quad is armed (yellow ARM box and yellow warning triangle icon) but the motors aren’t spinning, it could be that you have MOTOR_STOP enganged accidentally.
Click the Configuration tab and locate the ESC/Motor Features box in the upper right. In that box, ensure the MOTOR_STOP option is OFF (gray). Note: all the MOTOR_STOP feature does is determine whether or not the motors spin at idle when the quad is armed. It is recommended that this feature be turned OFF for safety. By allowing props to spin when armed, it’s an obvious visual indicator that the quad is armed and should not be approached. With MOTOR_STOP on, the props do not spin when armed and someone may approach the quad thinking it is disarmed.
8b. Flight Mode Switch
Modern flight controllers have 3 main flight modes to choose from:
Angle Mode (a.k.a auto-level): self leveling with a limit to how far the quad can dip in any direction
Horizon Mode: self leveling with no limit to how far the quad can dip
Rate Mode (a.k.a acro mode): completely manual.
There is an ongoing debate among quad pilots as to which mode a new pilot should start flying in. That debate will not be addressed here as this guide is solely intended to get Betaflight set up and the quad in the air. Once the pilot has formed his own opinion on flight modes, he can adjust the flight mode switch accordingly. For now, we are going to set up our three-position switch, Switch D, as follows:
Down (away from pilot): Angle Mode
Middle: Horizon Mode
Up (towards pilot): Rate Mode.
One key thing to understand about Betaflight is that the flight controller is in Rate (acro) Mode by default and only leaves Rate mode when another mode is turned turned on. If Angle or Horizon mode are not turned on, the quad is in Rate mode. As such, there is no selection for Rate Mode. It’s simply the “no modes” setting.
Remember that in Step 7, we set up Switch D to have values of 1000 when down, 1500 when in the middle, and 2000 when up. We will use these values and the slider bars to set the Flight Modes much the same way we set up our Arm switch.
Click the Modes tab in the Betaflight configurator and identify the ANGLE mode setting. Click the ADD RANGE button and then, to the right of the ANGLE mode box, click the drop down and select AUX 2, which is the value we assigned to Switch D on the radio.
Now scroll down through the mode options until you find the Horizon Mode setting. Click the ADD RANGE button and then click the drop down and select AUX 2 again, as we are using the same switch we used for Angle Mode.
Next manipulate the ANGLE slider so that it spans from the minimum, 900, to about 1200. Now, any time Switch D is sending a signal of 1000, the quad will be in Angle mode.
Then, manipulate the sliders for HORIZON to span from about 1300 to 1700. Now, any time Switch D is sending a signal of 1500, the quad will be in Horizon Mode.
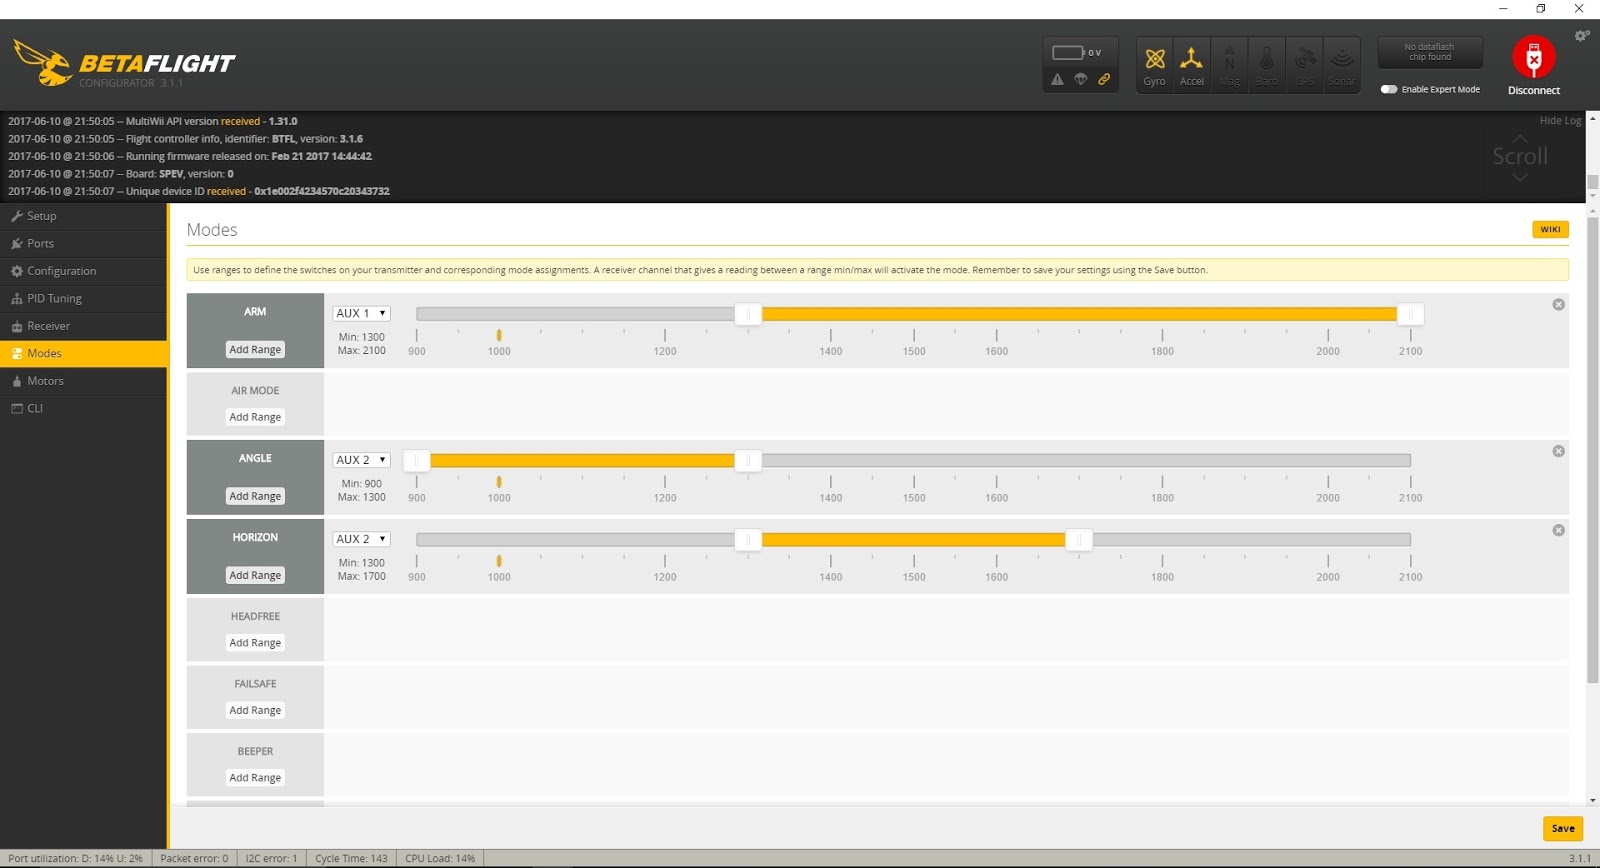
We do not need to set up the up switch position for Rate Mode because Rate Mode is the default when no other modes are selected. With Switch D in the up position, it’s sending a signal of 2000, which is neither Angle Mode nor Horizon Mode. So the quad defaults to Rate Mode.
Test the Mode switch switch like we did for the Arm switch. REMOVE YOUR PROPS BEFORE PLUGGING IN A BATTERY! Turn on the radio, plug in a battery, and ensure the flight controller is still connected to the PC via a USB cable. The small yellow indicator below the Angle Mode and the Horizon Mode slider bars should be pointing to 1000. The ANGLE box should be yellow and the HORIZON box should be gray.
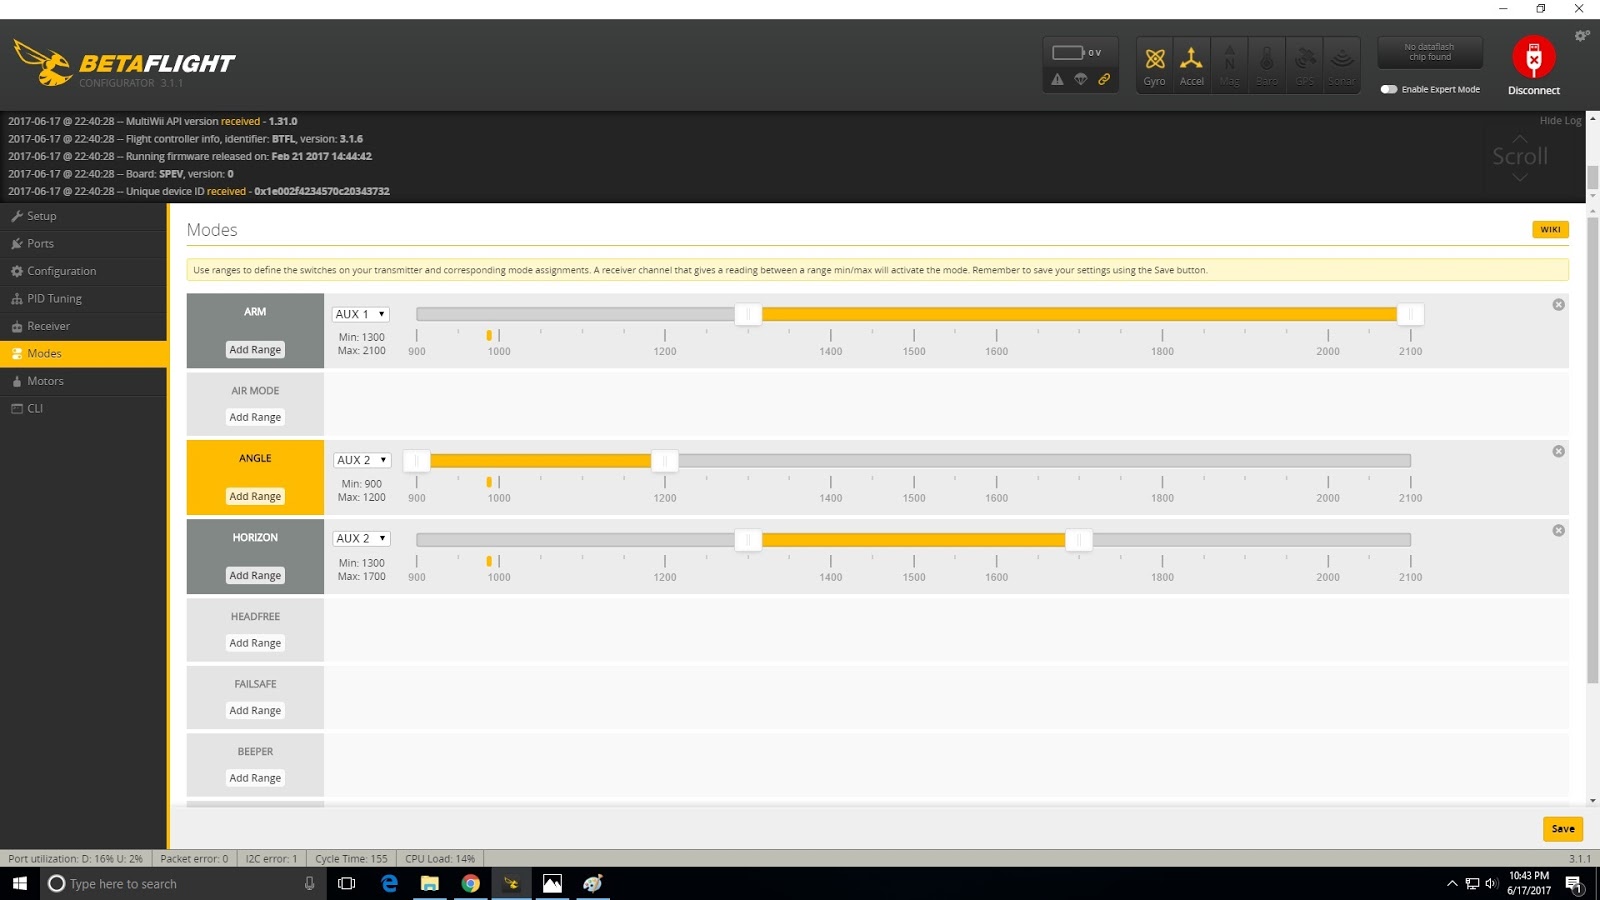
Now flip Switch D to the middle position. The yellow indicator should move to 1500, the ANGLE box should change to gray and the HORIZON box should change to the yellow.
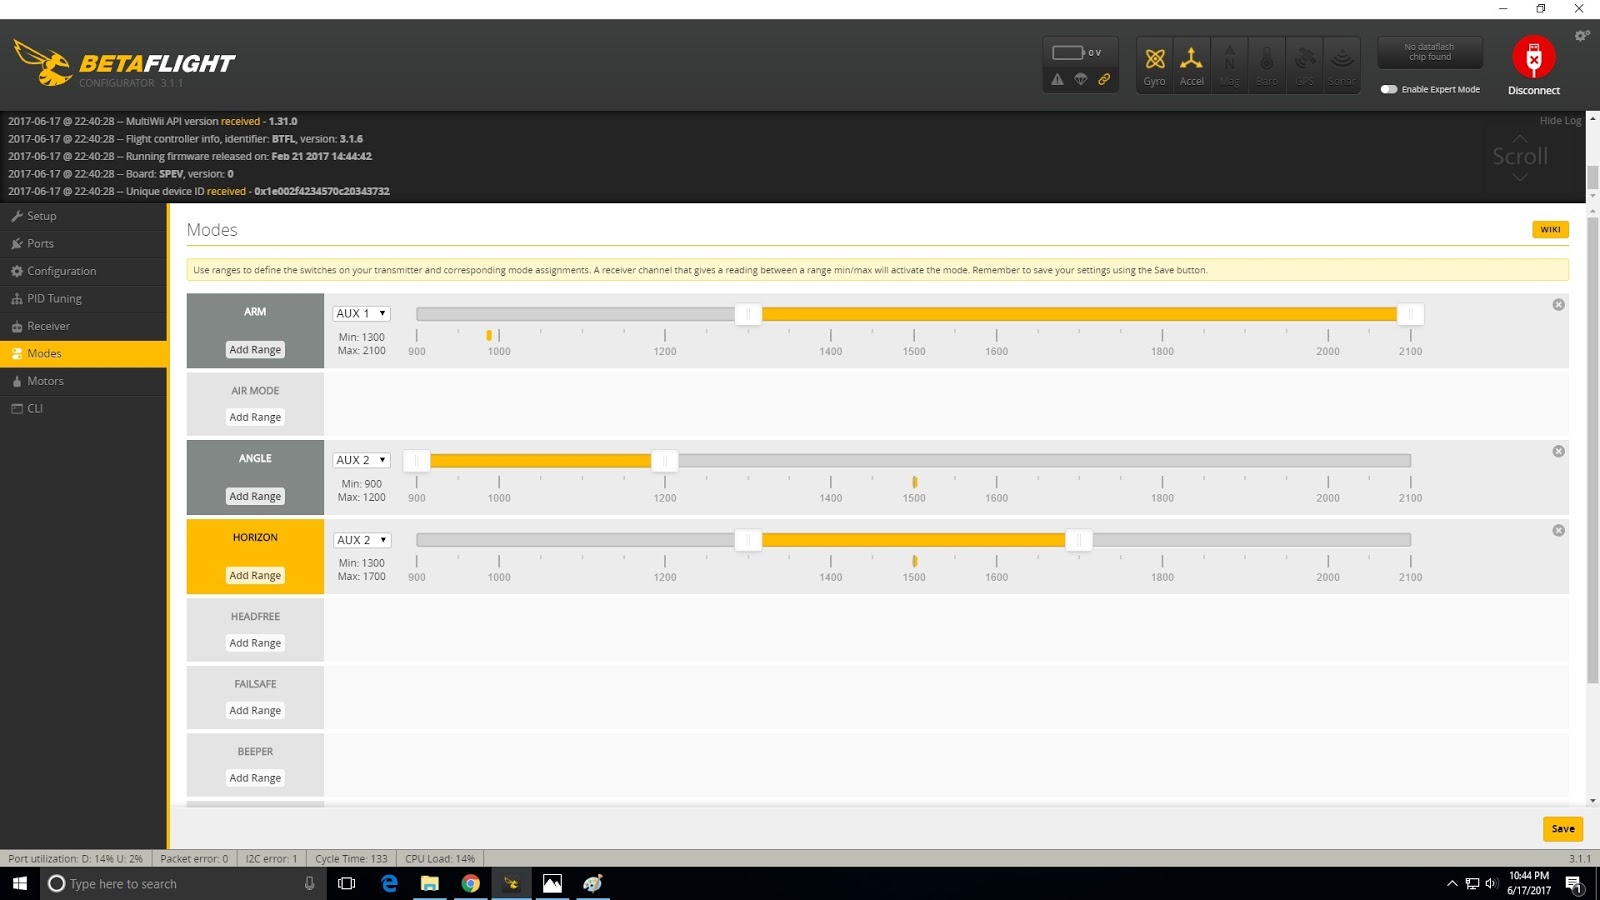
Finally, flip Switch D to the top position. The yellow indicator should move to 2000, the ANGLE box should be gray, and the HORIZON box should be gray. The quad is in Rate (acro) mode by default.

Your switches are now set up.